Tools Of The Trade
Recent Posts


Archives
- September 2022
- July 2022
- June 2022
- April 2022
- October 2021
- August 2021
- July 2021
- June 2021
- May 2021
- April 2021
- March 2021
- February 2021
- January 2021
- December 2020
- November 2020
- October 2020
- September 2020
- July 2020
- June 2020
- May 2020
- March 2020
- February 2020
- January 2020
- December 2019
- November 2019
- October 2019
- September 2019
- August 2019
- July 2019
- June 2019
- May 2019
- April 2019
- March 2019
- February 2019
- January 2019
- December 2018
- November 2018
- October 2018
- September 2018
- August 2018
- July 2018
- June 2018
- May 2018
- April 2018
- March 2018
- February 2018
- January 2018
- December 2017
- October 2017
- September 2017
- August 2017
- July 2017
- June 2017
- May 2017
- April 2017
- March 2017
- February 2017
- January 2017
- December 2016
- November 2016
- October 2016
- September 2016
- August 2016
- July 2016
- June 2016
- May 2016
- April 2016
- November 2015
- October 2015
- September 2015
- August 2015
- July 2015
- June 2015
- May 2015
Now that your knowledge in Gunpla is gaining ground, it’s time to talk about the tools used to build and customize these beautiful model kits. Read on to find out what the basic tools are as well as the more advanced hobby tools. Let’s start!
 I personally believe the only tool that is an absolute must when it comes to Gunpla is a good pair of side cutters (also known as nippers). These cutters might look like a normal cutting tool, but the good ones are made specifically for plastic models and have certain qualities that make them work so well. The more precise models can cut very close to the plastic part which reduces the excess plastic from the runner (more on this in a future post!) which makes the kits look nice and clean.
 Sometimes referred to as a modeller’s knife, the hobby knife is designed for high precision use. It allows the modeler to have accurate control of the blade over the plastic surface and makes it possible to scrape away excess plastic as well as to cut away certain parts for customization. The hobby knife is a versatile tool and can be used to pry very small stickers off their backing as to even nudge them into the right position when applying them.
 Sanding the plastic parts can be achieved using a number of different sanding tools. There’s a choice of sanding paper in sheets as well as sanding sticks that look like nail files. Regardless of which type you prefer, these come in various grits such as 400, 600, 800, and so on. The number indicates how rough the paper is with lower numbers meaning rougher paper. The lower grits are used to remove more plastic while the higher ones are used to polish the plastic. These tools do get used up as their roughness wears off, but there are also metal files that are meant to last a lot longer.
 You will notice your Gunpla kit has recessed lines in the plastic parts to give the kit definition. One of the easiest ways to give your kit a pro look is to go over these lines with a panel liner. These are basically very thin pens that add color and darken the panel lines. It is surprising how much better the kits look when properly panel lined!
 A good pair of tweezers goes a long way in picking up stickers and placing them in the right position. There are straight tweezers and ones that come with an angled edge to give you better view of the part you’re working on.
 Cutting mats come in different sizes and they are used for two main reasons. First of all, they protect your work surface from damage by your hobby knife while cutting. The other reason is that they often come with guide lines and shapes that can be used to measure plastic parts when customizing your kits.
 Professional modelers would never consider leaving their Gunpla kits unpainted! Often, the kits are painted in the same colors the parts are molded in. Although this might seem redundant, it actually adds a lot of realism to the kits by removing the plastic feel of the parts. An airbrush is used to spray a very fine mist of paint onto the plastic. In addition to painting the plastic parts, an airbrush can be used to add highlights to certain areas to give more definition to the kits.
 An advanced technique is to scribe your own panel lines where they do not exist! A scriber is a tool used to essentially dig out a very small groove into the plastic to create your own panel lining. You need a very steady hand a lot of preparation and design to pull this off but the results are well worth it.
 This miniature drill is used to create very small holes (as small as 0.2mm!) into the plastic for customization. The holes can be used to place custom rivets for a more realistic look, or they can be used to recreate bullet holes for a battle damaged effect.
 Putty is used to fill in gaps in plastic that modelers find unsightly. These gaps are usually part of the manufacturing process in order to save plastic, weight, and cost. The putty is very malleable when put on but hardens with time. A fresh coat of paint hides the putty and voila! No more unsightly gaps.
 There are several types of adhesives used for modeling but they are generally used to glue two halves of a segment together in order to remove the seam line between them. Adhesive is applied to both sides of the parts and after pressing them together, the excess adhesive oozes out between the parts. Once set, this can be sanded off and you end up with a seamless part.
 Masking tape is available in differing widths and it is used to mask off areas of your kit that you do not want to be painted. Once the masking is done, paint can be freely applied without worrying about the covered areas and after the paint sets, the tape can be removed to reveal the intentionally unpainted areas.
 Using spray paint can be harsh on the lungs (and the surroundings!) so a paint booth is used to extract the fumes from the painting process and directs them safely to an open window.
There are endless tools that can be used for Gunpla. We tried to cover the main ones in this post. Did we miss anything? What are your must have tools? Let us know in the comments below!
Using spray paint can be harsh on the lungs (and the surroundings!) so a paint booth is used to extract the fumes from the painting process and directs them safely to an open window.
There are endless tools that can be used for Gunpla. We tried to cover the main ones in this post. Did we miss anything? What are your must have tools? Let us know in the comments below!
Basic tools
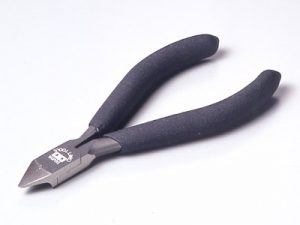
Nipper / cutter
 I personally believe the only tool that is an absolute must when it comes to Gunpla is a good pair of side cutters (also known as nippers). These cutters might look like a normal cutting tool, but the good ones are made specifically for plastic models and have certain qualities that make them work so well. The more precise models can cut very close to the plastic part which reduces the excess plastic from the runner (more on this in a future post!) which makes the kits look nice and clean.
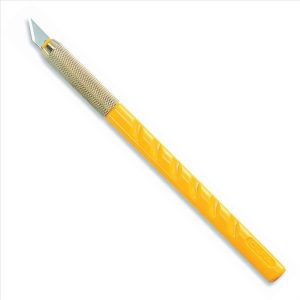
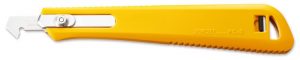
Hobby Knife / cutter
 Sometimes referred to as a modeller’s knife, the hobby knife is designed for high precision use. It allows the modeler to have accurate control of the blade over the plastic surface and makes it possible to scrape away excess plastic as well as to cut away certain parts for customization. The hobby knife is a versatile tool and can be used to pry very small stickers off their backing as to even nudge them into the right position when applying them.
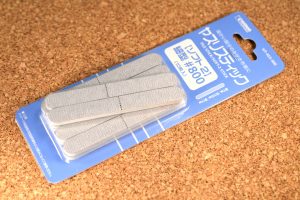
Sanding paper / sticks
 Sanding the plastic parts can be achieved using a number of different sanding tools. There’s a choice of sanding paper in sheets as well as sanding sticks that look like nail files. Regardless of which type you prefer, these come in various grits such as 400, 600, 800, and so on. The number indicates how rough the paper is with lower numbers meaning rougher paper. The lower grits are used to remove more plastic while the higher ones are used to polish the plastic. These tools do get used up as their roughness wears off, but there are also metal files that are meant to last a lot longer.
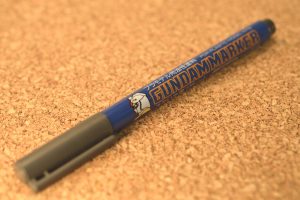
Panel lining pen
 You will notice your Gunpla kit has recessed lines in the plastic parts to give the kit definition. One of the easiest ways to give your kit a pro look is to go over these lines with a panel liner. These are basically very thin pens that add color and darken the panel lines. It is surprising how much better the kits look when properly panel lined!
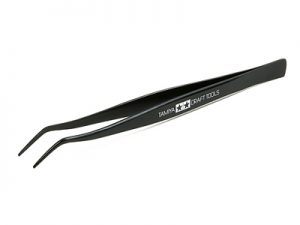
Tweezers
 A good pair of tweezers goes a long way in picking up stickers and placing them in the right position. There are straight tweezers and ones that come with an angled edge to give you better view of the part you’re working on.
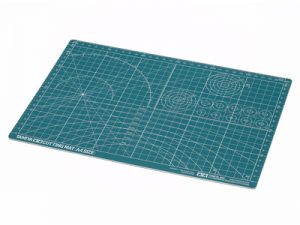
Cutting mat
 Cutting mats come in different sizes and they are used for two main reasons. First of all, they protect your work surface from damage by your hobby knife while cutting. The other reason is that they often come with guide lines and shapes that can be used to measure plastic parts when customizing your kits.
Advanced tools
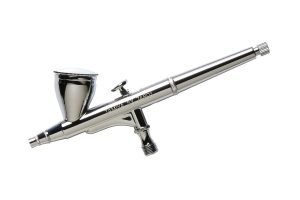
Airbrush
 Professional modelers would never consider leaving their Gunpla kits unpainted! Often, the kits are painted in the same colors the parts are molded in. Although this might seem redundant, it actually adds a lot of realism to the kits by removing the plastic feel of the parts. An airbrush is used to spray a very fine mist of paint onto the plastic. In addition to painting the plastic parts, an airbrush can be used to add highlights to certain areas to give more definition to the kits.
Scriber
 An advanced technique is to scribe your own panel lines where they do not exist! A scriber is a tool used to essentially dig out a very small groove into the plastic to create your own panel lining. You need a very steady hand a lot of preparation and design to pull this off but the results are well worth it.
Pin vice drill
 This miniature drill is used to create very small holes (as small as 0.2mm!) into the plastic for customization. The holes can be used to place custom rivets for a more realistic look, or they can be used to recreate bullet holes for a battle damaged effect.
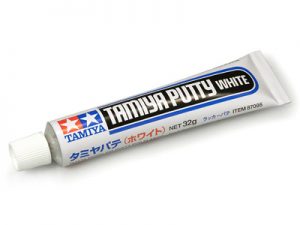
Putty
 Putty is used to fill in gaps in plastic that modelers find unsightly. These gaps are usually part of the manufacturing process in order to save plastic, weight, and cost. The putty is very malleable when put on but hardens with time. A fresh coat of paint hides the putty and voila! No more unsightly gaps.
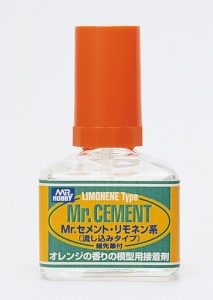
Adhesive
 There are several types of adhesives used for modeling but they are generally used to glue two halves of a segment together in order to remove the seam line between them. Adhesive is applied to both sides of the parts and after pressing them together, the excess adhesive oozes out between the parts. Once set, this can be sanded off and you end up with a seamless part.
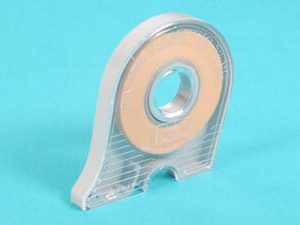
Masking tape
 Masking tape is available in differing widths and it is used to mask off areas of your kit that you do not want to be painted. Once the masking is done, paint can be freely applied without worrying about the covered areas and after the paint sets, the tape can be removed to reveal the intentionally unpainted areas.
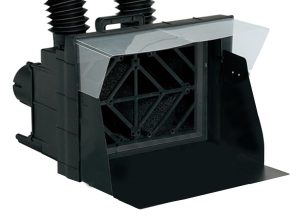
Spray booth
 Using spray paint can be harsh on the lungs (and the surroundings!) so a paint booth is used to extract the fumes from the painting process and directs them safely to an open window.
There are endless tools that can be used for Gunpla. We tried to cover the main ones in this post. Did we miss anything? What are your must have tools? Let us know in the comments below!
Using spray paint can be harsh on the lungs (and the surroundings!) so a paint booth is used to extract the fumes from the painting process and directs them safely to an open window.
There are endless tools that can be used for Gunpla. We tried to cover the main ones in this post. Did we miss anything? What are your must have tools? Let us know in the comments below!